
Zrozumienie kamienia PU i jego możliwości dostosowania
Czym są panele ze sztucznego kamienia? Poznaj skład wysokogęstego poliuretanu
Panele z imitacji kamienia są lżejszą alternatywą dla prawdziwego kamienia, wykonane z pianki poliuretanowej o wysokiej gęstości. Panele te naśladują wygląd i fakturę naturalnego kamienia, ale ważą około 85% mniej. Weźmy na przykład typowy panel o powierzchni jednego metra kwadratowego; według danych firmy OnSun WPC z 2023 roku waży on zazwyczaj około 6 kilogramów, w porównaniu do imponujących 40 kg rzeczywistego kamienia. Co sprawia, że te panele działają tak skutecznie? Ich rdzeń składa się z zamkniętej komórkowej pianki PU pokrytej specjalnymi powłokami odpornymi na uszkodzenia wodą, promieniowanie słoneczne oraz zmiany temperatury, zachowując jednocześnie integralność strukturalną przez długi czas.
Zalety opcji personalizacji kamienia z poliuretanu dla wyjątkowych przestrzeni architektonicznych
Skład kamienia PU umożliwia niezrównaną adaptowalność do nieregularnych lub niestandardowych ścian, oferując trzy główne korzyści:
- Elastyczność projektowania : Panele można łatwo przycinać, aby dopasować je do okien łukowych, narożników pod kątem lub nierównych powierzchni, bez utraty integralności strukturalnej.
- Efektywność kosztowa : Precyzyjne cięcie zmniejsza odpady materiałowe o do 15% w porównaniu z naturalnym kamieniem.
- Spójność estetyczna : Niestandardowe układy zapewniają spójne wzory na złożonych geometriach, co czyni je idealnym wyborem dla ścian akcentowych w domach oraz holów wejściowych w obiektach komercyjnych.
W jaki sposób skład materiału płyt PU/Foam Stone umożliwia łatwą modyfikację
Zamknięta struktura komórkowa poliuretanu pozwala na czyste cięcie za pomocą podstawowych narzędzi, takich jak nóż budowlany lub piła z drobnym ząbkowaniem, co nigdy nie zadziałałoby przy kruchym kamieniu naturalnym wymagającym drogiego sprzętu murarskiego. Panele PU również nie wyginają się znacznie, ponieważ rozszerzają się minimalnie przy zmianach temperatury, około 0,1 procenta na każde dziesięć stopni różnicy. Po przycięciu krawędzie dobrze szlifuje się i dobrze pasują do otaczającego materiału. Ta kombinacja łatwej formowania i trwałości świetnie sprawdza się zarówno dla amatorów realizujących własne projekty, jak i dla profesjonalistów zajmujących się trudnymi pracami montażowymi, których nikt inny nie chce wykonywać.
Pomiar i planowanie dla niestandardowych wymiarów ścian
Precyzyjne pomiary są niezbędne do skutecznego montażu kamienia PU na nierównych ścianach. Systematyczne planowanie pozwala architektom i wykonawcom osiągnąć aż 97% efektywności zużycia materiału w złożonych projektach (Raport o Montażu Kamienia 2023), minimalizując konieczność poprawek i obniżając koszty.
Pomiary i obliczanie ilości paneli dla powierzchni ścian z dokładnością
Aby rozpocząć, stwórz cyfrową mapę powierzchni ściany za pomocą laserów, które wykrywają wszystkie drobne nierówności i krzywizny. Najpierw ustal całkowitą powierzchnię w stopach kwadratowych. Następnie podziel tę liczbę przez powierzchnię pokrywaną przez każdą płytę. Nie zapomnij odjąć około pół procenta od końcowej liczby, ponieważ między płytami musi zostać miejsce na prawidłowe rozszerzanie się kleju. Załóżmy, że ktoś chce pokryć ścianę o wymiarach dwanaście stóp na dziesięć stóp. Według standardowych obliczeń potrzeba około trzydziestu paneli. Jednak dobrzy instalatorzy wiedzą, że nie można na tym poprzestać. Dodaj dodatkowo około piętnaście procent na wypadek niedokładnego dopasowania podczas cięcia lub łączenia wzorów. Zamiast więc zamawiać dokładnie trzydzieści paneli, lepiej zamówić od trzydziestu czterech do trzydziestu sześciu, aby uniknąć braku materiału w trakcie montażu.
Uwzględnianie nieregularnych kształtów: okna, narożniki i występy
Użyj papieru rosinowego do zaznaczenia przeszkód, takich jak okna lub rury, przed cięciem. Ta technika skróciła czas instalacji o 40% w ostatnim badaniu przypadku obejmującym łukowate otwory. W przypadku narożników pod kątem 45° dodaj dodatkowe 7% materiału, aby umożliwić precyzyjne cięcie pod kątem i zachować ciągłość wzoru.
Wykorzystanie układów siatki w celu minimalizacji odpadów i optymalizacji pokrycia kamieniem PU
Zastosuj modularny system siatki dostosowany do wymiarów paneli. Ta metoda obniżyła średni poziom odpadów materiałowych do 4,2% w 2023 roku, znacznie poniżej branżowego standardu wynoszącego 12%. Ponumeruj każdą komórkę siatki i oznacz odpowiadające tylnie paneli, aby zapewnić prawidłową kolejność podczas instalacji, co poprawia dokładność i płynność pracy.
Cięcie i kształtowanie paneli kamiennych PU dla idealnego dopasowania
Narzędzia niezbędne do bezpiecznego cięcia i montażu paneli kamiennych PU
Podstawowe narzędzia to:
- Noże uniwersalne lub piły ręczne z drobnym zębatym ostrzem do cięć prostych
- ściernica o ziarnistości 120 do wygładzania krawędzi
- Taśma miernicza, ekierka stolarska i okulary ochronne
- Klej budowlany i pistolet do kleju (szpachlowy) do montażu
Utrzymuj ostrza w ostrej kondycji, aby zapobiec rozrywaniu materiału. Do cięć krzywoliniowych używaj piły tarczowej do drewna w średniej prędkości, aby uniknąć stopienia rdzenia piankowego.
Krok po kroku: Przycinanie i cięcie paneli ze sztucznego kamienia do specjalnych wymiarów
- Pomiar dwa razy : Zanotuj dokładne wymiary, w tym gniazda lub rury.
- Zaznacz linie prowadzące : Użyj ołówka i linijki, aby narysować linie na odwrocie panela.
- Nacinaj głęboko : Wykonaj 3–4 mocne przekroje nożem budowlanym dla prostych cięć.
- Złam czysto : Delikatnie zginać wzdłuż naszczerbionej linii, aby oddzielić element.
- Przymierz : Przymocuj wszystkie przycięte panele przed nałożeniem kleju, aby potwierdzić ich prawidłowe ustawienie.
W przypadku nieregularnych kształtów najpierw wytnij nieco większe elementy, a następnie stopniowo szlifuj, aby uzyskać idealne dopasowanie.
Najlepsze praktyki dotyczące czystych krawędzi i zachowania faktury paneli po cięciu
Szljfuj wycięte krawędzie w jednym kierunku papierem o ziarnistości 120, aby naśladować naturalną chropowatość kamienia. Zawsze tnij od strony tylnej, aby zachować fakturę powierzchni. Przechowuj wycięte elementy płasko podczas wiązania kleju (24–48 godziny), aby zapobiec wyginaniu.
Typowe błędy przy pomiarach i cięciu paneli z poliuretanowego kamienia oraz sposoby ich unikania
- Pośpieszone pomiary : Uwzględnij szczeliny rozszerzalne o szerokości 1/8 cala wokół stałych obiektów.
- Tępe ostrza : Wymieniaj ostrza nożyków co każde 10 stóp liniowych, aby zachować czyste krawędzie.
- Pomijanie próbnego montażu : Nawet niewielkie nieprawidłowości ustawienia stają się widoczne w układach wielopanelowych.
W obszarach o wysokiej widoczności należy priorytetowo stosować pełne panele, zachowując przycięte fragmenty na krawędzie lub ukryte strefy.
Projektowanie estetycznych układów dla niestandardowych instalacji ściennych
Dostosowywanie układu paneli pod kątem estetyki na ścianach nietypowych rozmiarów
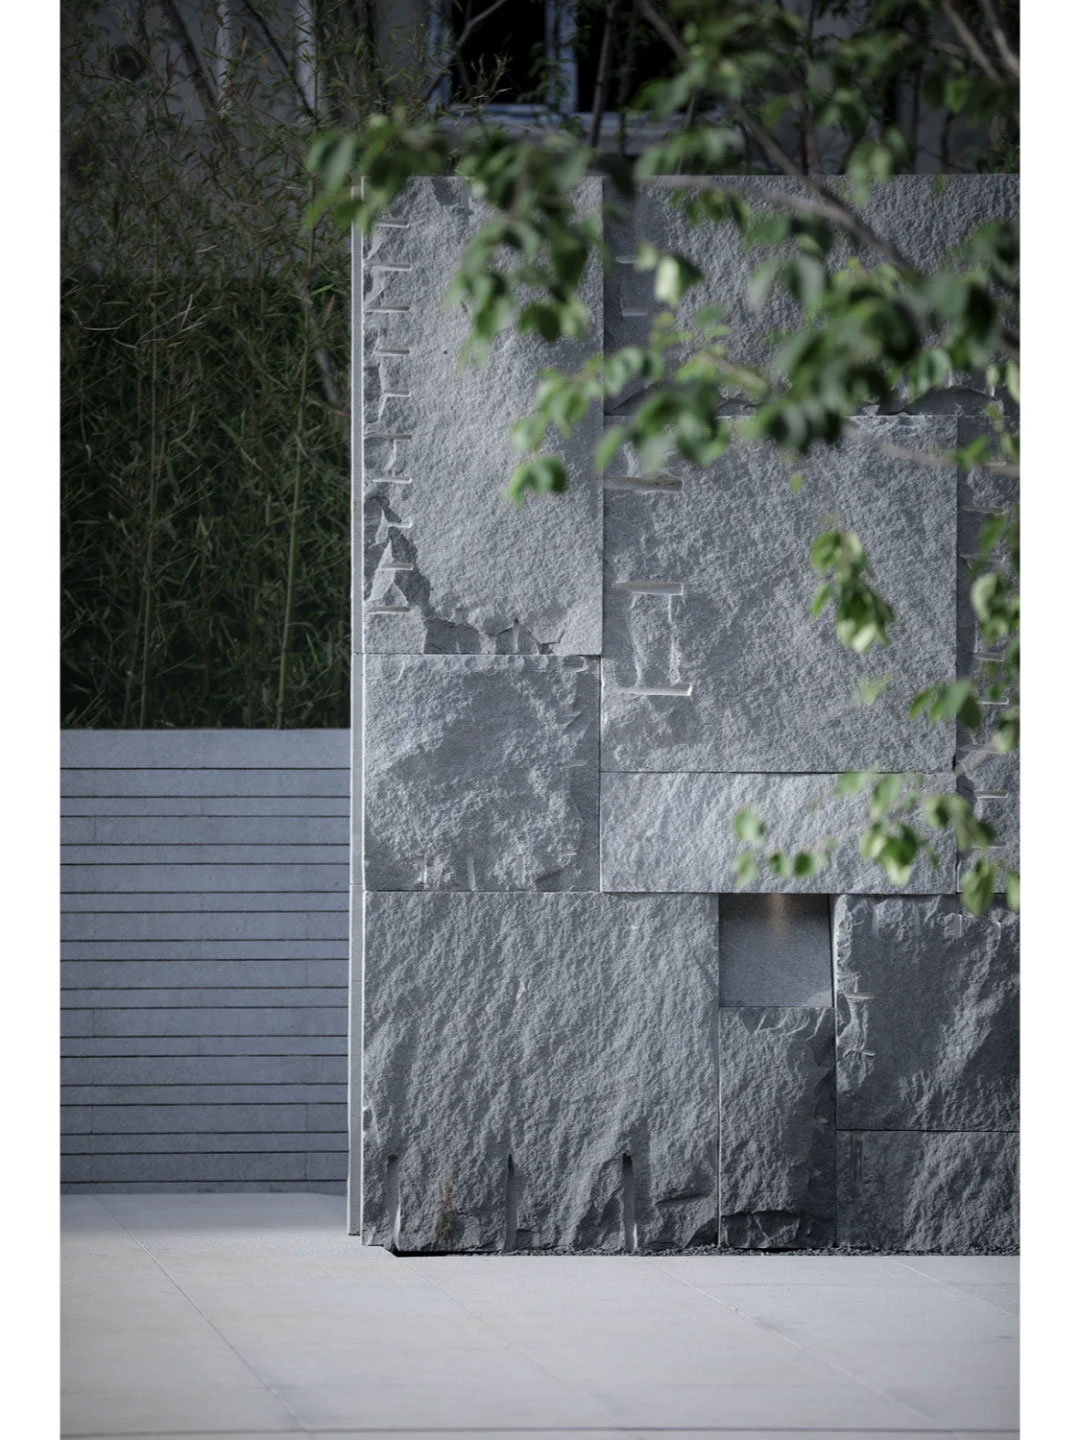
Uzyskanie gładkiego efektu na nierównych ścianach zaczyna się od ustalenia kształtu ściany. Większość osób albo ręcznie szkicuje siatki, albo korzysta z programów komputerowych, które wykonują za nie wszystkie obliczenia. Przy pracy z panelami standardowych rozmiarów, takimi jak typowe o wymiarach 24 na 48 cali, czasem trzeba je przeskalować lub przestawić. Mniejsze fragmenty o szerokości od 12 do 18 cali dobrze wpasowują się obok zakrzywionych okien, a układanie paneli na różnych wysokościach pozwala ukryć te irytujące wypukłości wystające ze ściany. Najnowszy raport branżowy z 2023 roku wykazał również ciekawy fakt: około sześciu na dziesięciu specjalistów ds. montażu faktycznie łączy całe panele z elementami dopasowanymi pod kątem, stosując mniej więcej trzy pełne panele na jeden niestandardowy element. Takie podejście sprzyja płynniejszym przejściom, unikając rzucających się w oczy przerw w miejscach styku paneli.
Balansowanie symetrii i ciągłości wzoru w niestandardowych instalacjach kamienia poliuretanowego
Podczas instalowania paneli staraj się dopasować szwy do istniejących elementów architektonicznych, takich jak ramy drzwiowe lub duże belki sufitowe wokół pomieszczenia. To pomaga osiągnąć bardziej gładki wygląd w całości. W przypadku ścian niesymetrycznych świetnie sprawdza się łączenie różnych faktur. Rozważ połączenie powierzchni gładkiej z tą o strukturze reliefowej w pobliżu, aby skierować uwagę tam, gdzie jest to potrzebne. Niektóre wiodące firmy projektowe stwierdziły na podstawie swoich projektów, że przełączanie co kilka paneli (około cztery do sześciu) między ciemnym a jasnym kolorowym kamieniem poliuretanowym (PU) może naprawdę pomóc w rozwiązaniu dziwnych problemów z deformacją przestrzeni, które czasem występują w pomieszczeniach z pochyłymi sufitami lub nietypowymi kątami ścian. Ich doświadczenia sugerują, że takie podejście redukuje anomalie optyczne o około 40 procent, według obserwacji zgromadzonych przez lata.
Orientacja pionowa vs. pozioma: wpływ na postrzeganą przestrzeń i kompozycję
| Orientacja | Najlepszy dla | Wpływ |
|---|---|---|
| Pionowy | Niskie sufity (2,4–2,7 m) | Zwiększa postrzeganą wysokość o 10–15% |
| Poziomy | Wąskie pomieszczenia (szerokość < 3,6 m) | Tworzy rozległe, otwarte wrażenie |
Ekspertowie branżowi zalecają pionowe instalacje w wejściach i klatkach schodowych. Badanie z 2024 roku na temat elastyczności materiałów wykazało, że 78% uczestników przeceniał wysokość pomieszczenia o 6"–8" przy użyciu pionowych układów, co podkreśla ich efekt powiększania przestrzeni. Poziome rozmieszczenie najlepiej stosować za meblami lub pod listwą sufitową, aby podkreślić szerokość, nie przytłaczając małych pomieszczeń.
Montaż i wykończenie paneli kamienia poliuretanowego na trudnych powierzchniach
Przegląd procesu samodzielnego montażu dla bezszwowego dopasowania na ścianach niestandardowych rozmiarów
Po pierwsze, przygotuj powierzchnię, niezależnie od tego, czy jest to płyta kartonowo-gipsowa, czy beton. Czysta i wyrównana podstawa ma ogromne znaczenie podczas mocowania elementów na ścianach. Panele z kamienia PU to prawdziwa rewolucja, ponieważ ważą o około trzy czwarte mniej niż naturalny kamień. Dzięki temu łatwiej przenosić duże panele podczas suchego montażu przed ostatecznym zamocowaniem. Musisz przyciąć panel? Użyj dobrej jakości noża budowlanego lub piły o drobnych zębach. Ważna wskazówka: zawsze cięcie wykonuj od tylnej strony, aby zachować nienaruszoną piękną fakturę czołowej powierzchni.
| Cechy | Panele z kamienia PU | Kamienie naturalne |
|---|---|---|
| Waga | 0,5–2 funty/stopę kw. | 12–25 funtów/stopę kw. |
| Instalacja | Samodzielnie za pomocą kleju | Wymagana pomoc specjalisty |
| Cięcie | Nóż uniwersalny | Narzędzia murarskie |
Wybór kleju i techniki aplikacji dla bezpiecznego mocowania paneli z kamienia PU
Użyj trwałego kleju budowlanego przeznaczonego do materiałów poliuretanowych. Nanosząc klej na odwrotną stronę panela, prowadź nitki w kształcie zygzaka, skupiając się na krawędziach i środku panela w celu zapewnienia maksymalnego przytrzymywania. Każdy panel dociskaj mocno przez 30 sekund, aby zagwarantować trwałe połączenie, szczególnie ważne na nierównych lub niestabilnych powierzchniach.
Zapewnienie prawidłowego wyrównania i poziomego ułożenia podczas montażu pełnych i częściowych paneli
Rozpocznij od dolnego narożnika ściany, używając poziomicy laserowej do wyznaczenia prostych rzędów. W przypadku częściowych paneli wokół gniazdek elektrycznych lub naroży sprawdź ich wyrównanie względem sąsiednich pełnych paneli przed zamocowaniem. Szczeliny szersze niż 1/8 cala wypełnij taśmami piankowymi z warstwą klejącą, aby zapobiec wyginaniu i zachować gładką powierzchnię.
Uszczelnianie styków i krawędzi w celu uzyskania efektu naturalnego kamienia
Zamknij szwy między panelami akrylowym uszczelnieniem dopasowanym do koloru, aby uzyskać monolityczny wygląd. W środowiskach zewnętrznym lub o wysokiej wilgotności uszczelnij krawędzie wodoodpornym silikonem. Poprawne uszczelnienie nie tylko zwiększa realizm, ale także wydłuża żywotność instalacji, blokując przedostawanie się wilgoci za panele.
Spis treści
-
Zrozumienie kamienia PU i jego możliwości dostosowania
- Czym są panele ze sztucznego kamienia? Poznaj skład wysokogęstego poliuretanu
- Zalety opcji personalizacji kamienia z poliuretanu dla wyjątkowych przestrzeni architektonicznych
- W jaki sposób skład materiału płyt PU/Foam Stone umożliwia łatwą modyfikację
- Pomiar i planowanie dla niestandardowych wymiarów ścian
- Pomiary i obliczanie ilości paneli dla powierzchni ścian z dokładnością
- Uwzględnianie nieregularnych kształtów: okna, narożniki i występy
- Wykorzystanie układów siatki w celu minimalizacji odpadów i optymalizacji pokrycia kamieniem PU
-
Cięcie i kształtowanie paneli kamiennych PU dla idealnego dopasowania
- Narzędzia niezbędne do bezpiecznego cięcia i montażu paneli kamiennych PU
- Krok po kroku: Przycinanie i cięcie paneli ze sztucznego kamienia do specjalnych wymiarów
- Najlepsze praktyki dotyczące czystych krawędzi i zachowania faktury paneli po cięciu
- Typowe błędy przy pomiarach i cięciu paneli z poliuretanowego kamienia oraz sposoby ich unikania
- Projektowanie estetycznych układów dla niestandardowych instalacji ściennych
- Dostosowywanie układu paneli pod kątem estetyki na ścianach nietypowych rozmiarów
- Balansowanie symetrii i ciągłości wzoru w niestandardowych instalacjach kamienia poliuretanowego
-
Montaż i wykończenie paneli kamienia poliuretanowego na trudnych powierzchniach
- Przegląd procesu samodzielnego montażu dla bezszwowego dopasowania na ścianach niestandardowych rozmiarów
- Wybór kleju i techniki aplikacji dla bezpiecznego mocowania paneli z kamienia PU
- Zapewnienie prawidłowego wyrównania i poziomego ułożenia podczas montażu pełnych i częściowych paneli
- Uszczelnianie styków i krawędzi w celu uzyskania efektu naturalnego kamienia